Hasura

This tutorial assumes Hasura backend was selected. If Apollo Server Express was selected, check out the Apollo Server Express version.

In this tutorial we'll add an optional due date for todos.

Learn how to:

  • Navigate your full stack
  • Make cross platform changes

Backend

Spin up Hasura and Postgres locally. From the root of the project run:

yarn start

This runs docker-compose up which brings up everything in Docker (Hasura, Postgres). Check out the docker-compose.yaml file and the docs for details.

Bring up the Hasura developer console. This is where we can make changes to Hasura and Postgres.

cd hasura/
yarn hasura console # This requires the backend Hasura backend is up (can take a minute)

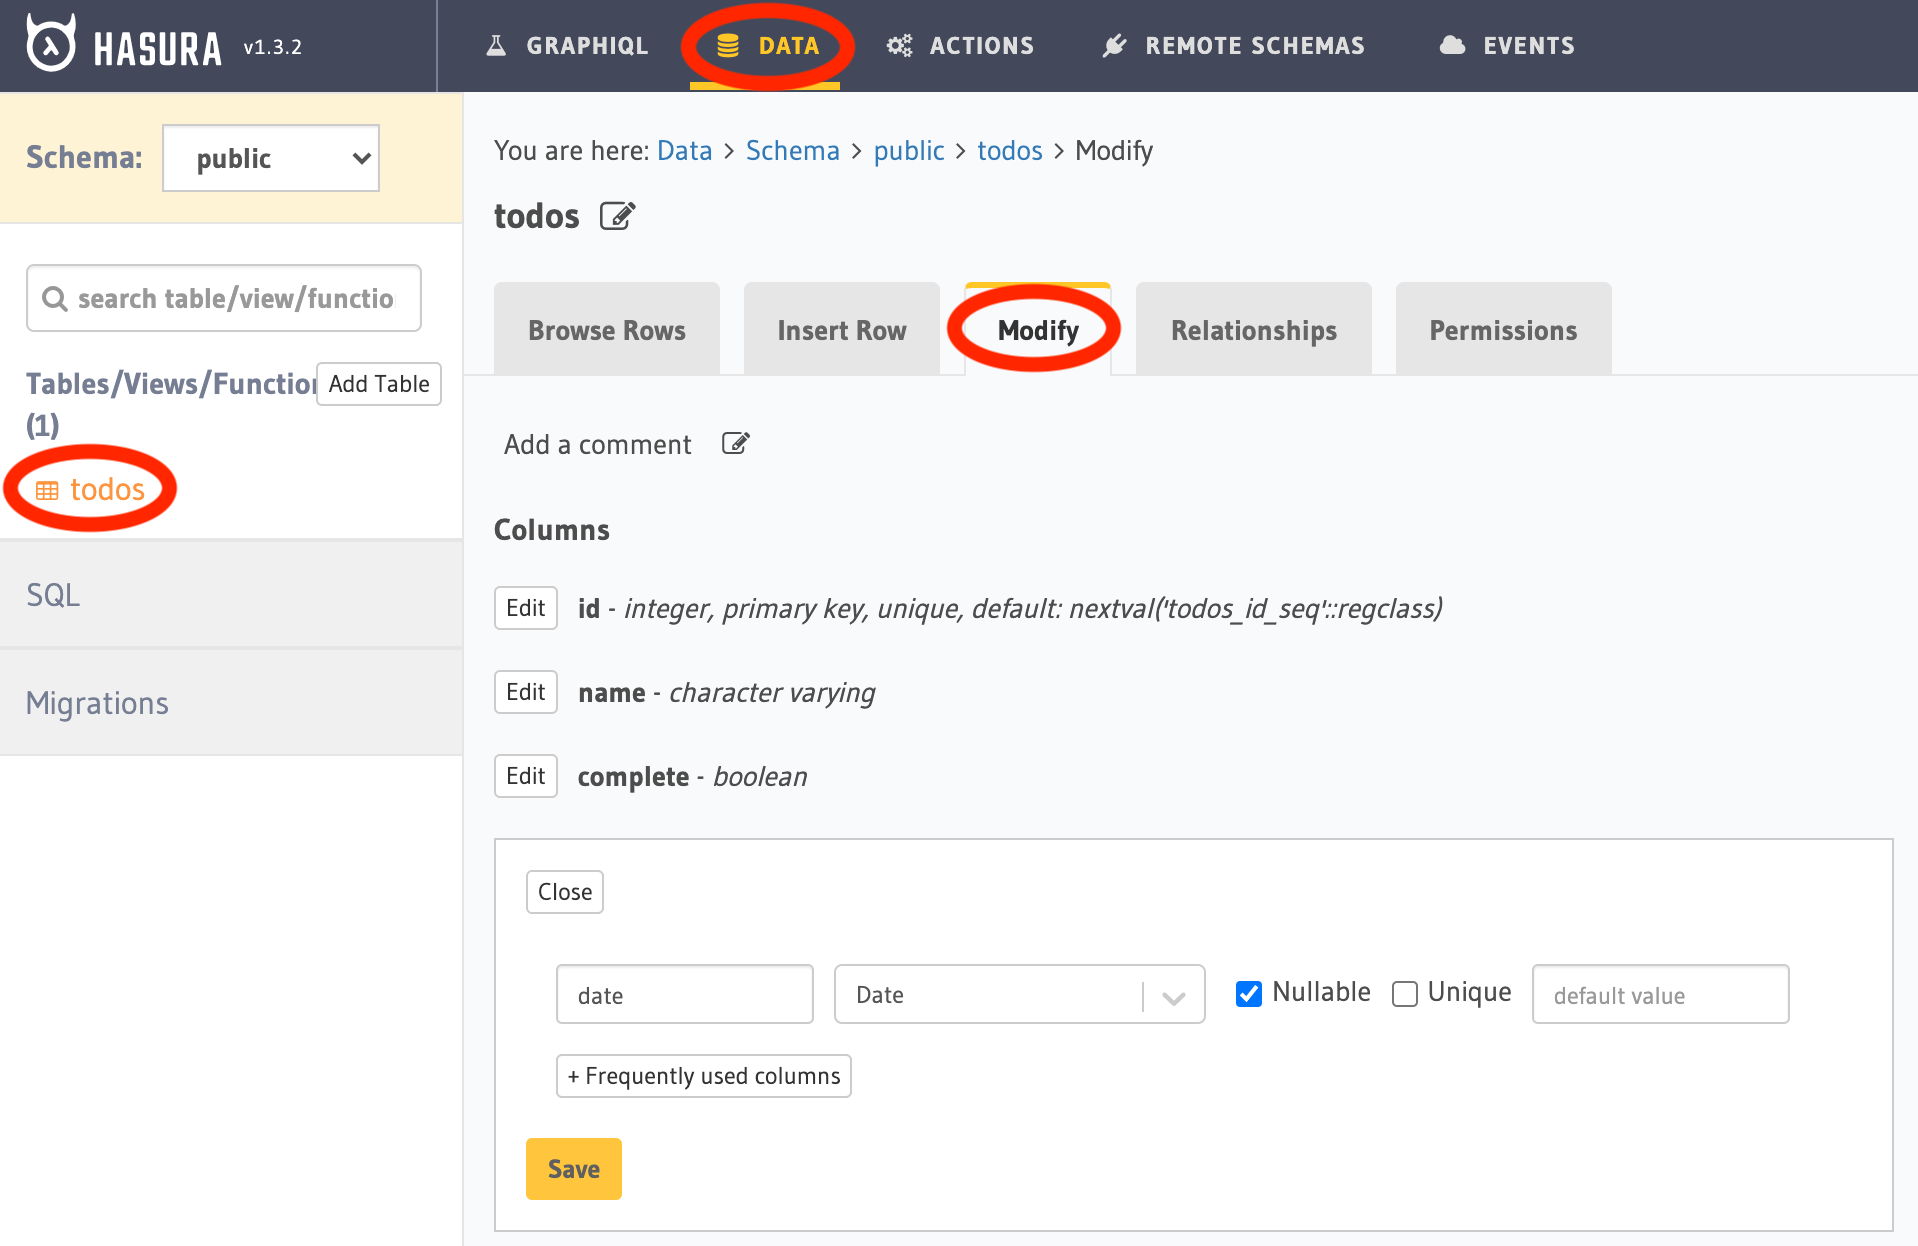
Add a "date" column to todos.

  • Click "DATA" on the top navigation bar
  • Click "todos" under tables on the left
  • Click the "Modify" tab under "todos"
  • Click "Add a new column"
  • Set "column name" to "date"
  • Set "column_type" to "Date"
Hasura add date

Learn more on the Hasura schema docs

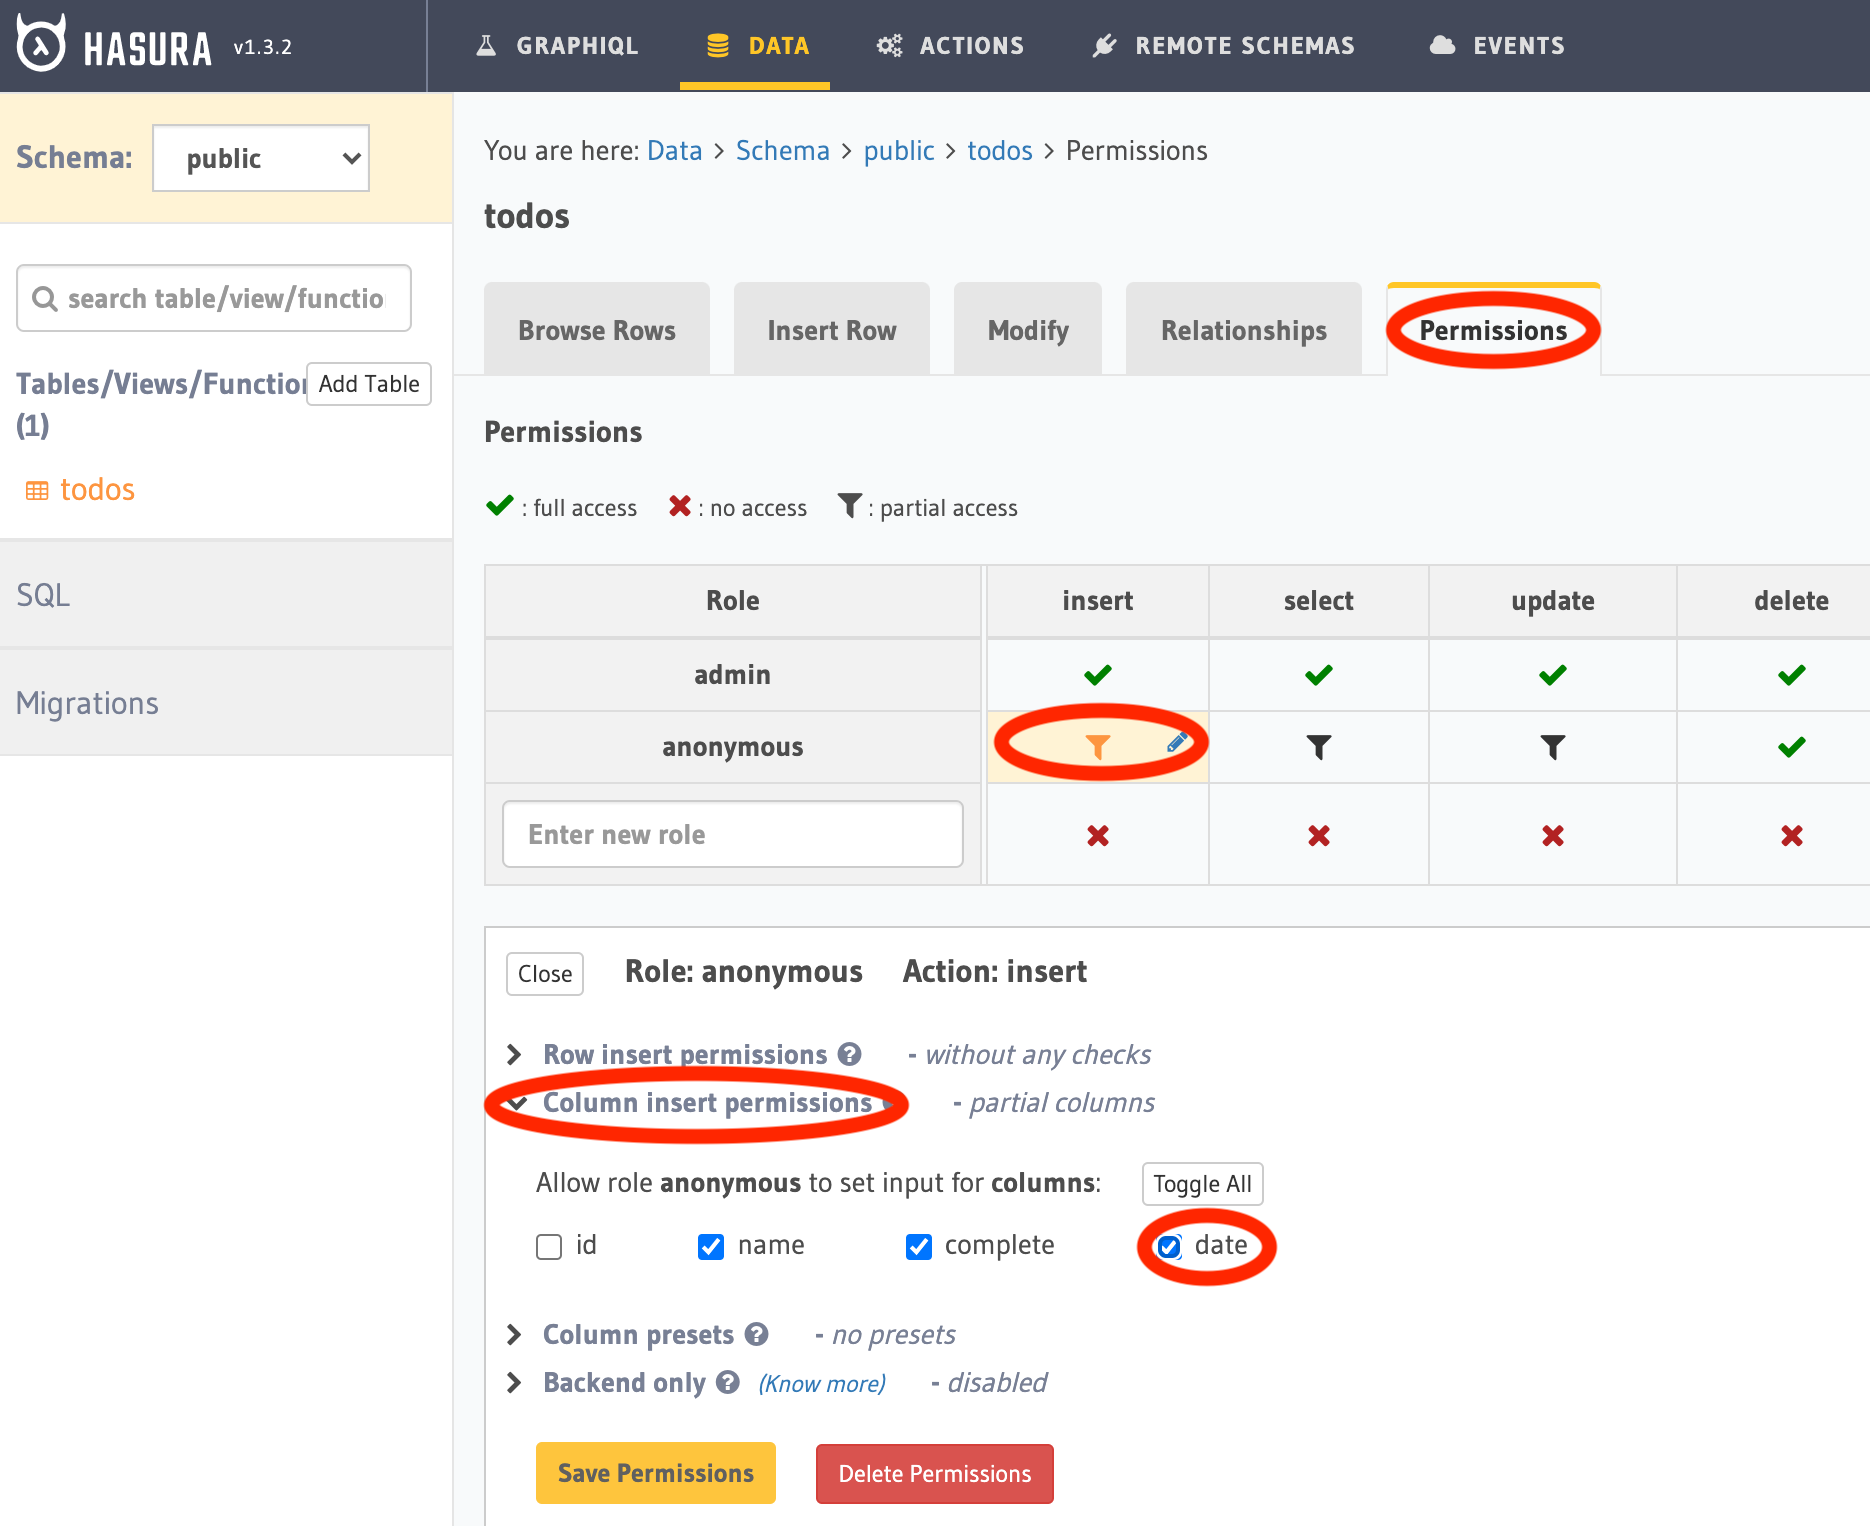
Add insert permissions for "date".

  • Click the "Permissions" tab under "todos"
  • Click the filter icon under the "anonymous" role ("user" if auth is enabled) and the "insert" permissions
  • Click "Column insert permissions"
  • Check "date"
Hasura permissions insert date

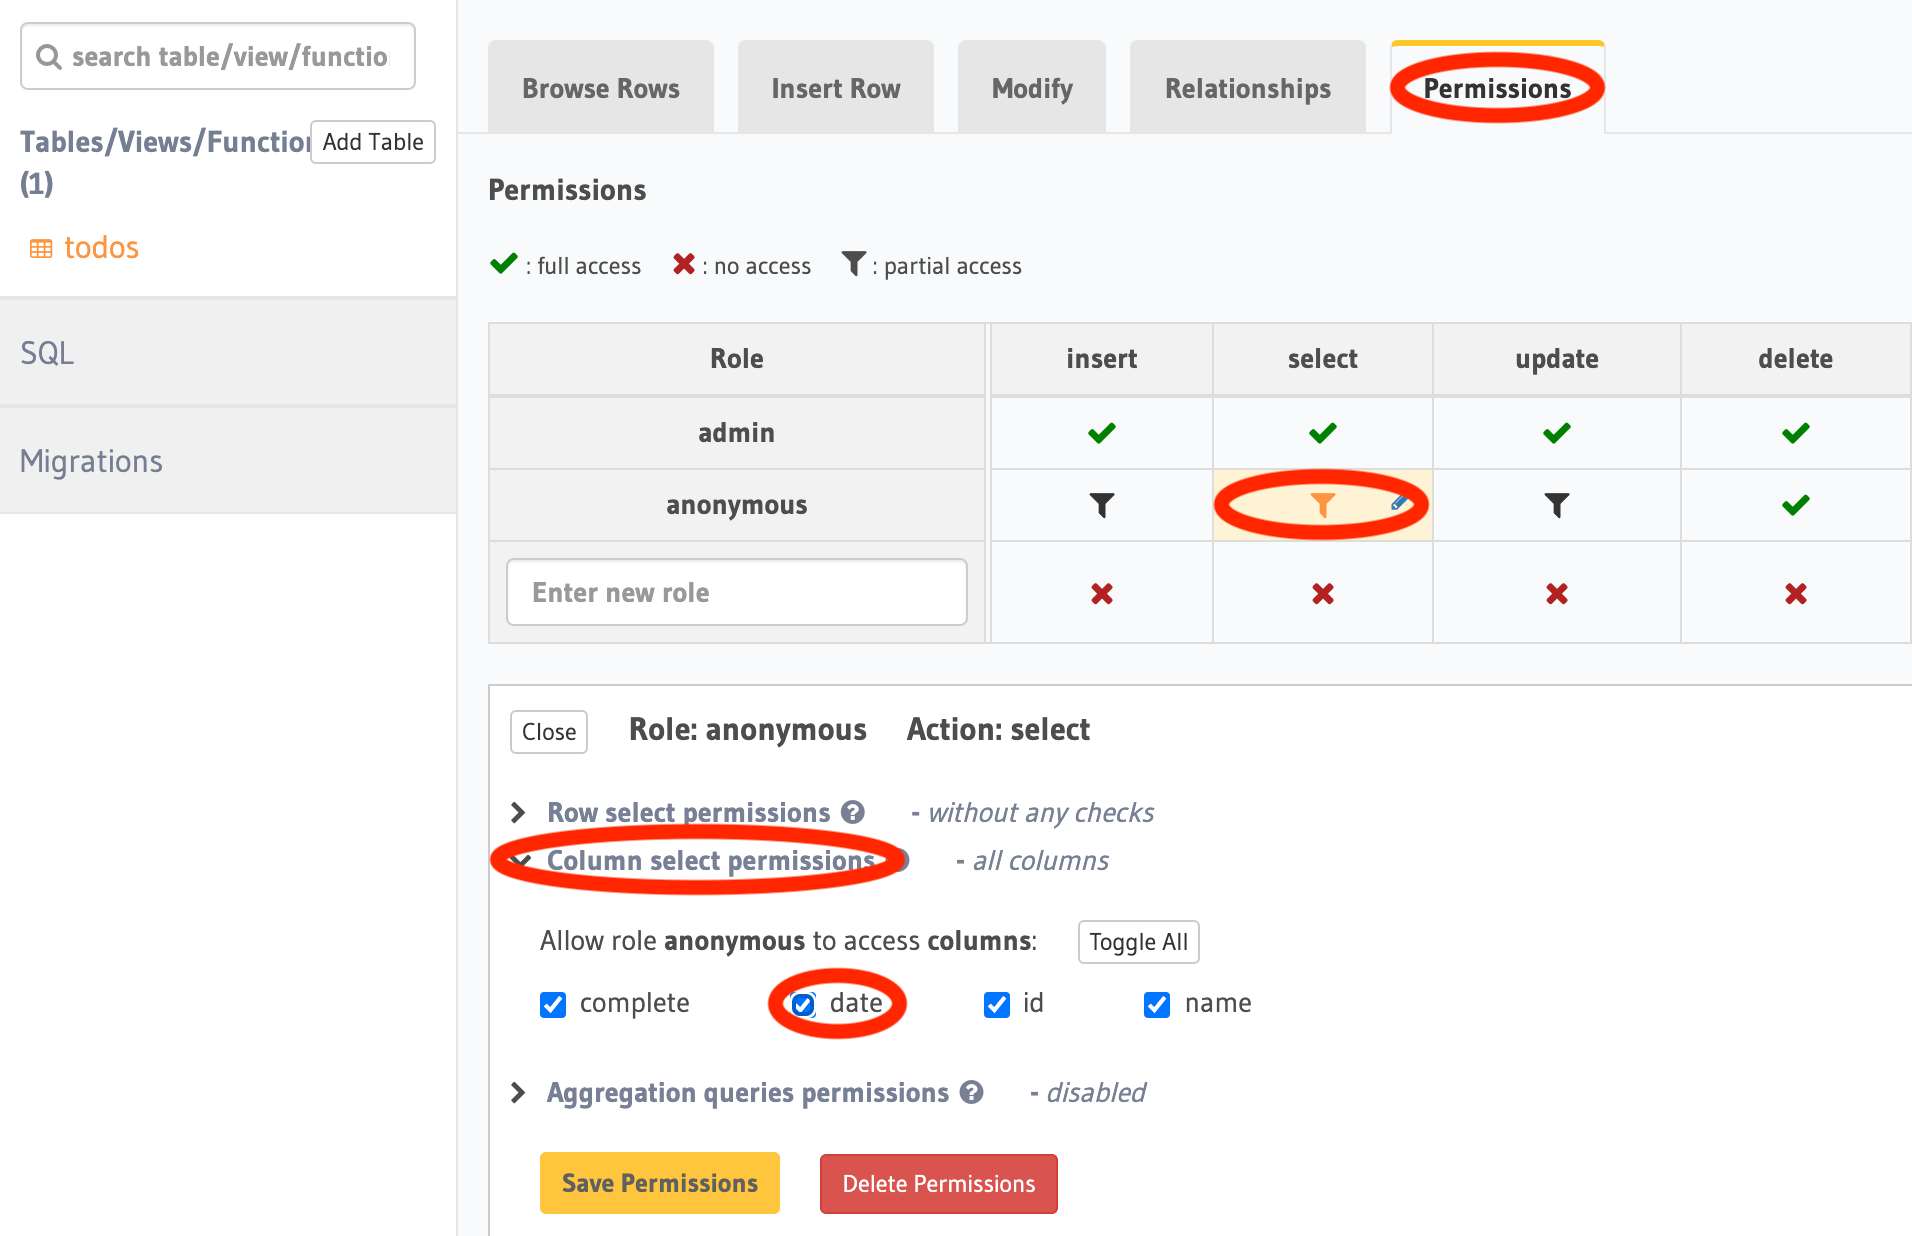
Add select permissions for "date".

  • Click the filter icon under the "anonymous" role ("user" if auth is enabled) and the "select" permissions
  • Click "Column select permissions"
  • Check "date"
Hasura permissions select date

That's it!

If you run git status you'll notice that changes have been made to the hasura/metadata/ and hasura/migrations/ folders. This tracks changes to Hasura and should be checked in. Learn more about CFS Hasura migrations on the docs.

Common

Common contains shared code across the full stack. It's used for client Apollo GraphQL requests from both web and mobile.

Update the GraphQL query and create mutation requests to include "date".

In packages/common/src/graphql/todos.graphql make the following changes:

# Add a date scalar. This is defined on the backend
# Hasura scalar docs:
# https://hasura.io/docs/1.0/graphql/core/api-reference/postgresql-types.html#date
scalar date
query Todos {
todos {
id
name
complete
# Add the date to the todos query
date
}
}
# Add date to the mutation input fields
mutation CreateTodo($name: String!, $date: date) {
insert_todos(objects: { name: $name, date: $date }) {
returning {
id
name
complete
# Add date to the mutation response
date
}
}
}

That's it!

When your run yarn start from the root of the project TS code is generated and packages/common is built automatically. See graphql-code-generator to learn how this works.

Web

If web was included, then follow these steps to configure it for the new todo date field.

We're using the Material-UI Pickers library for the date picker. This has a couple dependencies.

First, install the packages:

cd packages/web/
yarn add @date-io/date-fns@1.x date-fns @material-ui/pickers

Add MuiPickersUtilsProvider to packages/web/src/App.tsx:

This tells pickers which date management library it should use with MuiPickersUtilsProvider. This component takes a utils prop, and makes it available down the React tree with React Context. It should be used at the root of your component tree, or at the highest level you wish the pickers to be available.

// Add the imports
import DateFnsUtils from "@date-io/date-fns";
import { MuiPickersUtilsProvider } from "@material-ui/pickers";
// ...
return (
<ApolloProvider client={client}>
{/* Add MuiPickersUtilsProvider wrapper */}
<MuiPickersUtilsProvider utils={DateFnsUtils}>
<Router>
{/* ... */}
</Router>
</MuiPickersUtilsProvider>
</ApolloProvider>
);
}

Update packages/web/src/components/CreateTodo.tsx:

// ...
// Add the import
import { KeyboardDatePicker } from "@material-ui/pickers";
export default function CreateTodo() {
const [name, setName] = useState("");
const [createTodo, { loading }] = useCreateTodo();
// Use a react hook to store the input date state.
// Dates are optional. If not set, the value is null.
const [date, setDate] = useState<Date | null>(null);
function onSubmit() {
// Add "date" to the createTodo variables
createTodo({ variables: { name, date } });
setName("");
// Reset the input date to null after submission
setDate(null);
}
return (
<TextField
// ...
InputProps={{
endAdornment: (
<InputAdornment position="end">
{/* Add KeyboardDatePicker component */}
<KeyboardDatePicker
disableToolbar
variant="inline"
format="M/dd/yyyy"
margin="normal"
label="Date"
value={date}
onChange={setDate}
KeyboardButtonProps={{
"aria-label": "change date",
}}
/>
<IconButton aria-label="add" onClick={onSubmit} disabled={loading}>
<AddIcon />
</IconButton>
</InputAdornment>
),
}}
/>
);
}

Update ListItemText in packages/web/src/components/Todo.tsx:

<ListItemText
// If date is set, display it in the todo item
primary={`${todo.name}${
// toLocaleDateString("en-US") uses "M/dd/yyyy" date formatting
todo.date ? ` (${new Date(todo.date).toLocaleDateString("en-US")})` : ""
}`}
classes={todo.complete ? { primary: classes.complete } : undefined}
/>

Make sure files are properly formatted and linted. In VSCode, with the recommended extensions, this happens automatically. Otherwise, from the root of the project run:

yarn prettier
yarn lint

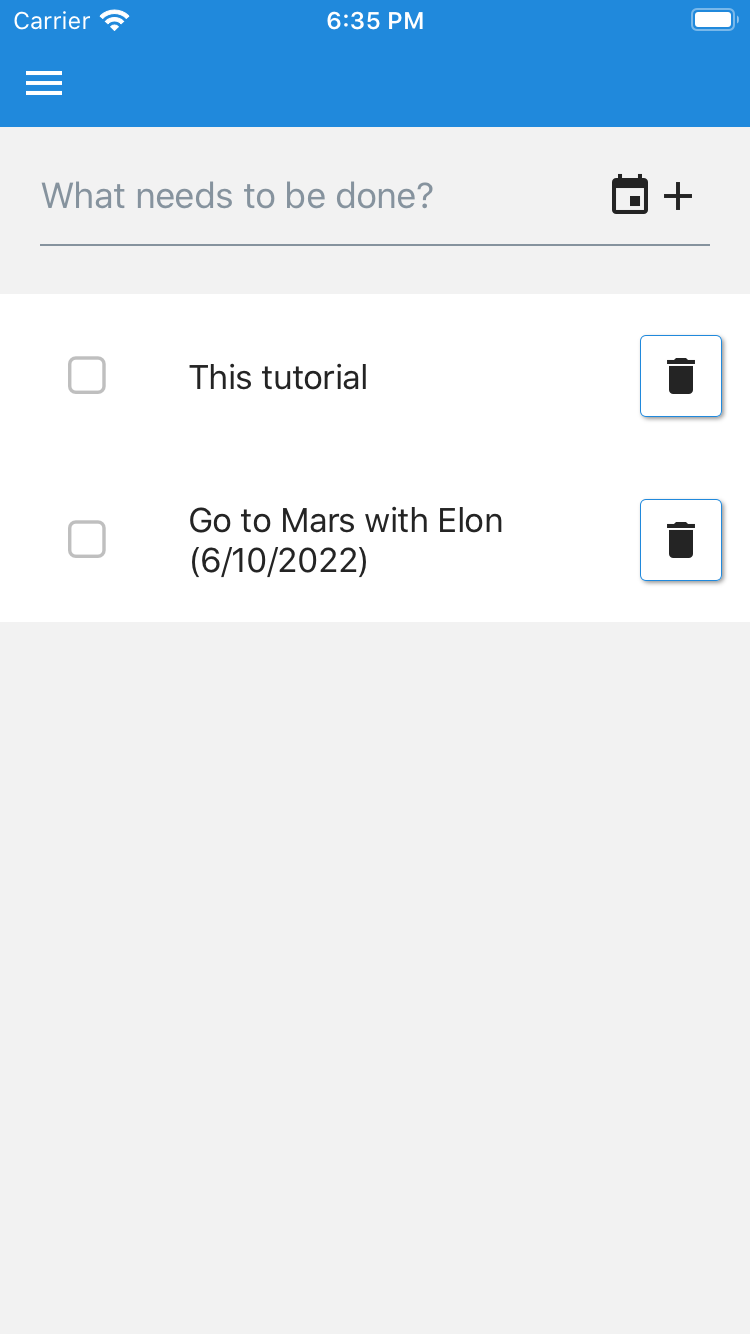
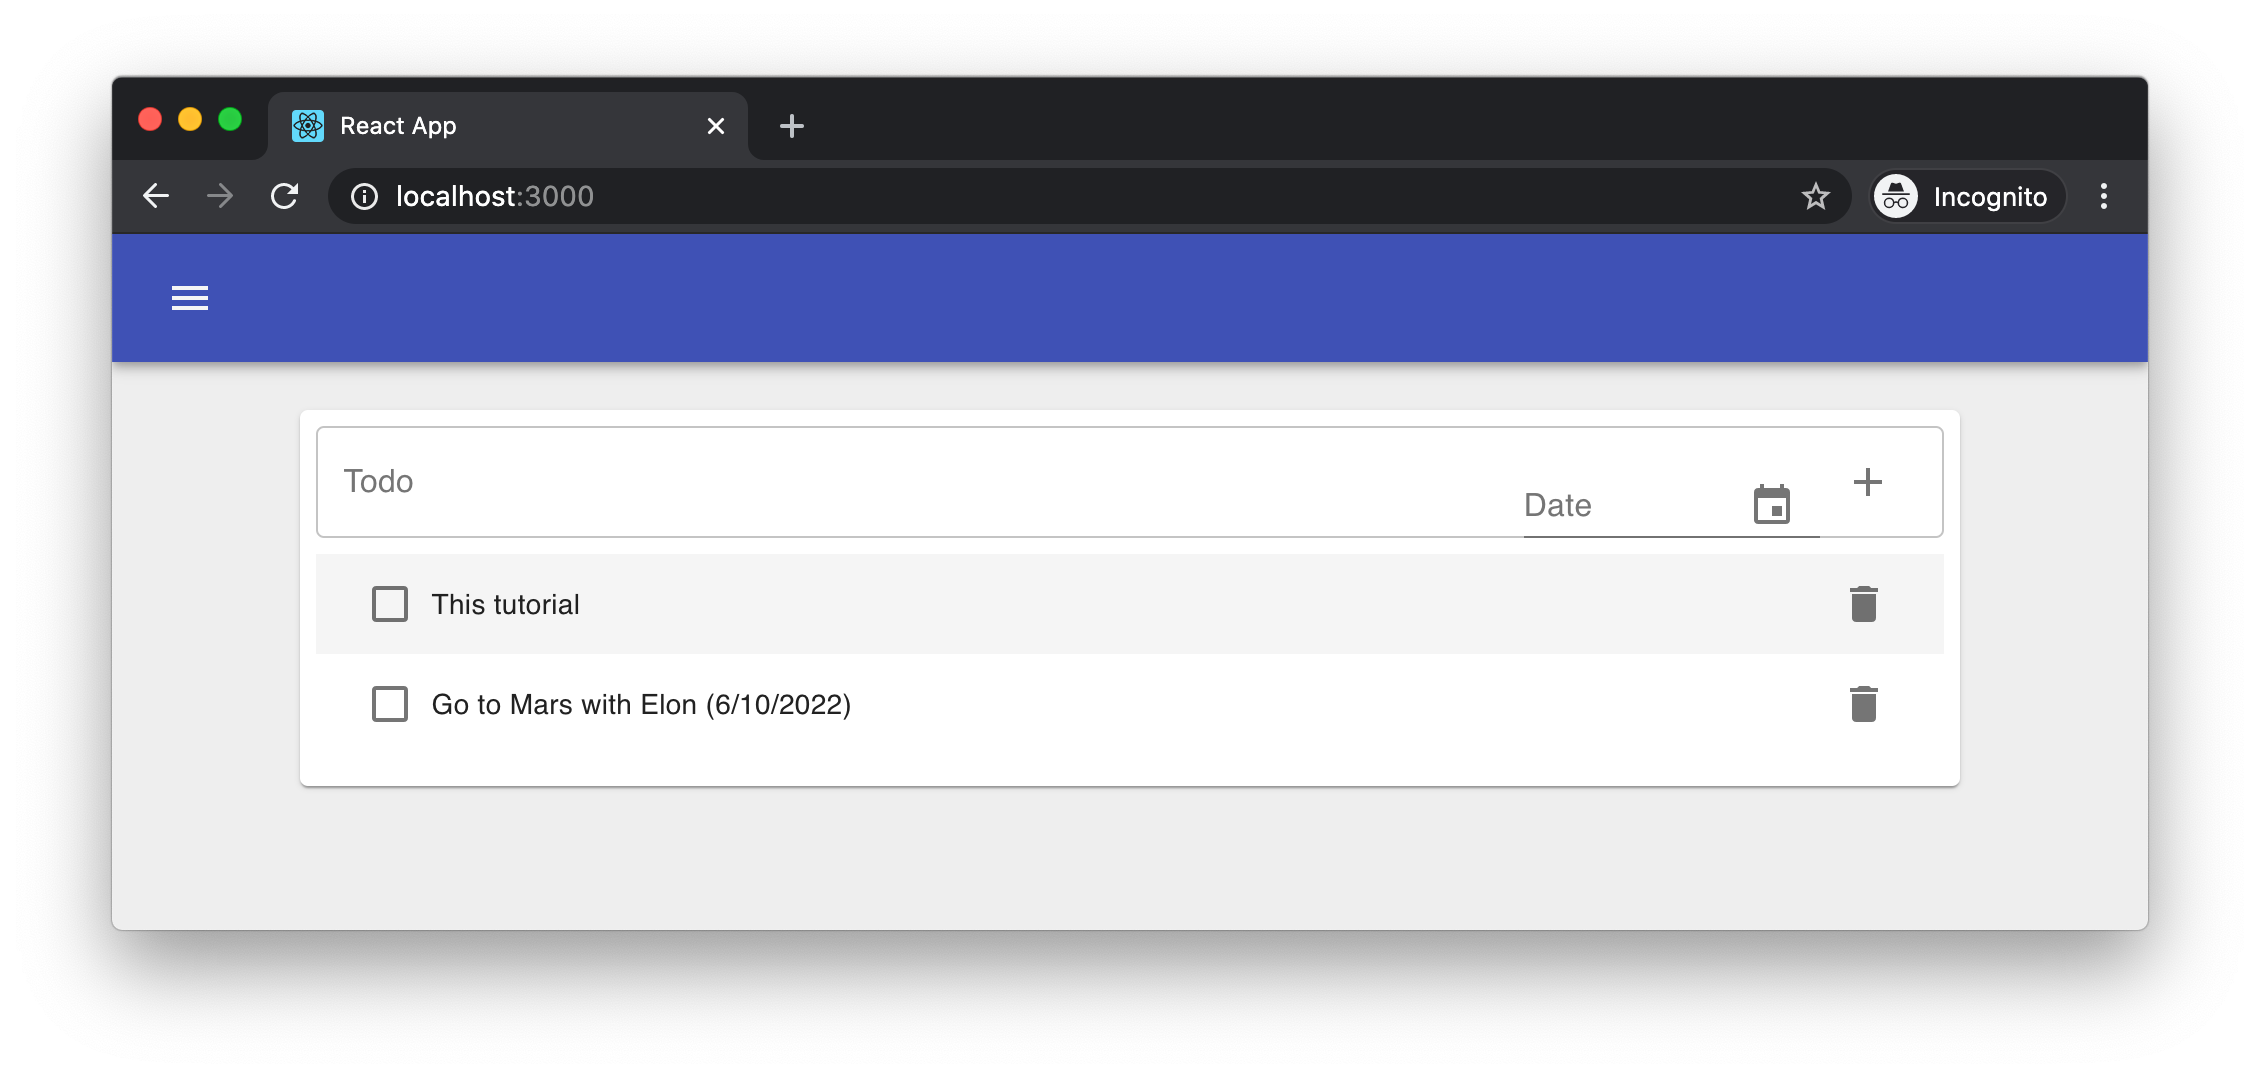
With the full stack running (yarn start from root), navigate to http://localhost:3000. You should see your new todo date field! 🎉

Add date web

Mobile

If mobile was included, then follow these steps to configure it for the new todo date field.

We're using the react-native-modal-datetime-picker for the date picker.

First, install the package and dependency:

cd packages/mobile/
yarn expo install react-native-modal-datetime-picker @react-native-community/datetimepicker

We're using yarn expo install to ensure Expo supported versions of the libraries are used. Since Expo uses native code in its SDK, typically only a single version of a library with native dependencies can be used per version of Expo. Expo handles this mapping with its install command. Learn more on the Expo docs.

Update packages/mobile/src/components/CreateTodo.tsx:

// ...
// Add the import
import { Text, TouchableOpacity } from "react-native";
import DateTimePickerModal from "react-native-modal-datetime-picker";
const styles = StyleSheet.create({
// ...
// React Native uses FlexBox. Add a new CSS class to make content inside
// horizontally laid out.
row: {
display: "flex",
flexDirection: "row",
},
});
export default function CreateTodo() {
const [name, setName] = useState("");
const [createTodo] = useCreateTodo();
// Use a react hook to store the input date state.
// Dates are optional. If not set, the value is null.
const [date, setDate] = useState<Date | null>(null);
const [showDatePicker, setShowDatePicker] = useState(false);
function onSubmit() {
// Add "date" to the createTodo variables
createTodo({ variables: { name, date } });
setName("");
// Reset the input date to null after submission
setDate(null);
}
return (
<View style={styles.root}>
<Input
placeholder="What needs to be done?"
value={name}
onChangeText={(text: string) => setName(text)}
onSubmitEditing={onSubmit}
rightIcon={
<View style={styles.row}>
{
// Add TouchableOpacity. This is a button that displays the modal
// to change the date.
}
<TouchableOpacity
style={styles.row}
accessibilityLabel="date"
onPress={() => setShowDatePicker(true)}
>
<Text>
{
// toLocaleDateString("en-US") uses "M/dd/yyyy" date formatting
date?.toLocaleDateString("en-US")
}
</Text>
<Icon name="event" />
</TouchableOpacity>
<Icon name="add" accessibilityLabel="submit" onPress={onSubmit} />
</View>
}
/>
{
// Add the DateTimePickerModal. This is a modal that displays a date
// picker when the button is pressed.
}
<DateTimePickerModal
isVisible={showDatePicker}
mode="date"
onConfirm={(dueDate) => {
setDate(dueDate);
setShowDatePicker(false);
}}
onCancel={() => {
setDate(null);
setShowDatePicker(false);
}}
/>
</View>
);
}

Update ListItem.Title in packages/mobile/src/components/Todo.tsx:

<ListItem.Title style={todo.complete ? styles.lineThrough : undefined}>
{
// If date is set, display it in the todo item
`${todo.name}${
// toLocaleDateString("en-US") uses "M/dd/yyyy" date formatting
todo.date ? ` (${new Date(todo.date).toLocaleDateString("en-US")})` : ""
}`
}
</ListItem.Title>

Make sure files are properly formatted and linted. In VSCode, with the recommended extensions, this happens automatically. Otherwise, from the root of the project run:

yarn prettier
yarn lint

With the full stack running (yarn start from root), navigate to http://localhost:19002 and bring up the application. You should see your new todo date field! 🎉

Add date mobile